Tag Archives: collage

The Joys of Teaching Mixed Media: Part 4 Language and Letters

Raborn, “Notice,” 2014, acrylic and charcoal on panel, 25×25″

There are many reasons and ways to add language to our work. While teaching a mixed media workshop at the Arkansas Arts Center, I always wish we could spend more time on language, letters, and words.

DSC_0058

Raborn, “The Code Breaker,” 2015, mixed media on panel, 18×24″

Words can be the focus of the artwork, the complete purpose of the piece. Or words can be subtly buried within the work. We can add thoughts, names, lyrics, accomplishments, names of places, religious passages, historic quotes, dates, poems, all sorts of words. Words can be used to set a mood, or can be used to contrast something in the piece. They can be unclear and confusing; they can be mysterious. They can be filled with meaning or completely meaningless. Letters can be used to establish a pattern, where the letter loses meaning and is simply a chosen shape for the composition, as seen in the work of Robert Rauschenberg. Words can be borrowed from the media or from a product to reference popular culture. There must be countless motives to incorporate words into artwork; I’ve listed just a fraction of the reasons.

IMG_0243

detail of demo from Arkansas Arts Center workshop

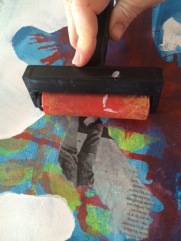
If you are considering adding language to your work, here are a few methods. First, you can simply hand write on a painting. Try charcoal (use a spray fixative – even hair spray will work in a pinch), pencil, markers, paint….just about any mark making tool will work for handwriting on a water based paint such as acrylics or water color. You can also use all these mediums with letter and number stencils or stamps. Stencils and stamps produce a mechanical look with a hard edge which can be a stark contrast to loosely painted areas of a composition. Look at this Richard Prince piece (below) I had the joy of finding at the National Portrait Gallery in Washington, D.C. Notice the loose brushwork and monochromatic layers of paint. Notice the drips and the splotchy paint under the letters. The mechanical lettering highly contrasts the surrounding and underlying space which is a bit jarring for the viewer. Another contrast is set up conceptually: there is an odd humor among the dark palette. The disjointed messages are confusing and dark while simultaneously comical.

DSC_0966

Richard Prince, “In Morning,” 2002, acrylic and oil on canvas, 89×75″

photo 2 (1)

Detail from demo

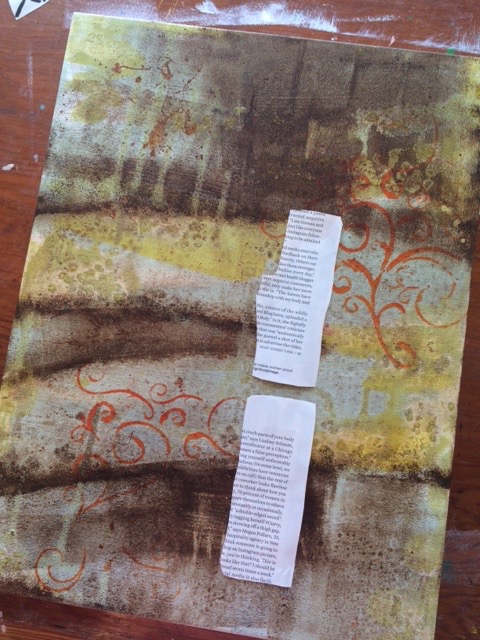
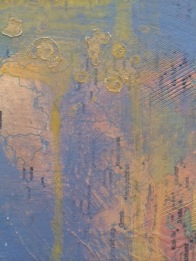
Using collage by cutting letters out of old books, magazines or any printed material works well and is one of my favorite ways to add words, particularly when I plan to add more layers on top of the collaged letters. In the example on the left, I first glued color copies of a map on a gessoed canvas. After the glued paper was totally dry, I then added acrylic gel medium on top of the maps. While the medium was wet (and slightly thick), I raked a comb through the medium to create lined texture. After the medium dried, I painted over the entire piece with the light blue acrylic paint. In order to re-expose the map, I wiped back some blue paint with a damp paper towel (NOTE: in the last post of this workshop series, I will talk more about acrylic gel medium layers and about the yellow drippy layer).

photo(28)

Raborn, detail from “Mixed Messages,” 2015, mixed media on panel, 16×20″

Remember the recent post about image transfer? The transfer method is an excellent way to add language because the letters look embedded into the artwork instead of added on top.

While this sounds counter intuitive, I try not to think too literally when considering language in my work. I recall comments professor Taimur Cleary frequently made during grad school critiques. He pointed

Raborn, Untitled, 2014, acrylic and charcoal on panel, 32×24″

out that sometimes my marks resemble language. He allowed me to see the potential in creating marks that remind the viewer of letters and words but are meaningless (in terms of legibility). But the marks can still have a desired effect: making the viewer lean in and WANT to read the work. The IDEA of language as a form of communication can exist in a work without any actual letters or words! Following are two examples of the incorporation of words into paintings. They make it look so easy!

DSC_0842

Robert Rauschenberg, “Dam,” 1959

wool_w040.tif

Christopher Wool, The Harder You Look


If you’re still not feelin’ it and want to hear an inspiring lecture about the importance of words in every aspect of our lives, check out the TED Talk by writer Kelly Corrigan. It might initially seem unrelated to a mixed media workshop post, but opportunities like listening to Kelly’s talk is one of the many rudders that steers the direction of my artwork. I think you’ll find her inspiring, too.

http://tedxtalks.ted.com/video/More-Reading-Kelly-Corrigan-at

IMG_0103

Next up: You think you can’t draw? Oh, yes you can! We’ll review several approaches to drawing and how to include the drawn line in your mixed media artwork. Thank you for reading!  Laura


Hanging out with David Bailin, artist and drawing teacher extraordinare


The Joys of Teaching Mixed Media: Part 3 Collage

Confession: Until I started teaching a Mixed Media workshop at the Arkansas Arts Center, I failed to see the value in collage. In my mind, collage reeked of the 1970’s decoupage trend combined with my memories of glue sticks in the 1st grade.

photo 2

Laura Raborn, detail of Untitled (workshop experiment), 2015, mixed media on paper

I had a total change of heart during a recent workshop, when gluing images of women from a fashion magazine on a heavily textured painting. Like many of the methods I describe in this series of posts, collage works well in the layering process. Images can be altered to create or emphasize a concept that has no association with the original meaning of the collaged image. It is simply a tool to CONTRAST other marks in the piece or a tool to allude to an idea. In the example to the left, the female figure is barely visible, as it has been sanded, painted, and scrubbed. Once the eye finds the figure, it is as if a discovery has been made and the search for recognizable imagery among the abstraction and texture is part of the allure.

The tools you need are minimal: any type of glue (acrylic gel medium is my favorite) plus text, photos, magazine images, or whatever you can cut out and glue down. Remember, you can also appropriate from your own photos or artwork – just incorporate them into a larger piece. I’ve used my hand-drawn stencils as collage pieces and it is now one of my favorite techniques. In the painting below, can you see the strip of fabric that runs vertically on the right side? And the cut out male figure behind the girl’s eye? The collage item can be embedded into the painting and does not have to be highly visible or representational. It can help build the surface, establish a pattern, or support an idea presented elsewhere in the piece.

16 x 20"

Laura Raborn, “Girl Looking Outward”, 2015, mixed media on wood panel, 16 x 20″

IMG_4803As I’ve stated about many mixed media methods, collage is a method that CONTRASTS hand drawn or painted areas. This juxtaposition makes engaging composition. Take for example the work of Tyler Hildebrand, seen here on the left. The highly recognizable Waffle House signage contrasts the childlike drawings. Had the Waffle House sign been hand drawn or painted, the acute idea of American food signage would be diminished. The collage material makes the viewer go back and consider the sign again and again.

IMG_4805In another Hildebrand painting, the artist uses a drawing from his childhood and with painted line, tethers the drawing to the bulbous male form. Including the actual paper drawing in the composition conveys history. It doesn’t just allude to keepsakes – the dinosaur drawing on notebook paper IS a keepsake. The collage item encourages the viewer to ponder ideas about memory or childhood experiences traveling with us throughout adulthood.

When considering various images to appropriate, remember the collage item(s) can become your surface under other media, as seen in the work of German artist, Sigmar Polke. Seen below, Polke draws scenes and uses stencils on top of fabric swatches. If you are a mixed media artist, it would be worth your time to further investigate the work of Sigmar Polke. As an experimental painter and photographer, he brilliantly used all of the techniques (plus some) we explore in the mixed media class at the Arkansas Arts Center – including image transfer, the use of language, collage, stencils, stamps, drawing, layers, patterns and textures. He was ferociously experimental with all materials, allowing for the accident to coincide with concept.

Lastly, another effective way to alter the meaning of the original collage item, is to merge photos in order to create something else altogether. Is there something you are passionate about but feel unable to convey through painting and drawing? Communicate your ideas through a creative fusing of photographic imagery. Let’s say my goal is to create a piece about sea turtles and human activity. After printing photos I found online, I am playing with various combinations (please note this is not a well thought out example – just a moderately successful demo):

photo 4 (1)photo 3photo 1photo 5

Searching for photos online to fit the sea turtle idea, and trying to guess about scale while printing was fairly time consuming. Many collage artists  keep organized files to store interesting images they come across in the mail, catalogs, magazines, and any other printed material. Then they just search their own categorized files when starting a project. Artist Holly Roberts does an excellent job explaining her process – and her work is inspirational for those trying to learn more about collage.

To see her work, visit http://www.hollyrobertsstudio.com/
For a short informative video about her methods, visit: https://www.youtube.com/watch?v=Z5dqxGVI4sA

Next up in the mixed media workshop series: Incorporating text and language into compositphoto 2 (1)ions. Until then, thank you for reading….and a Happy Healthy New Year to all!


The Joys of Teaching Mixed Media: Part 2 Image Transfer

DSC_0031In the last post, I described a workshop I periodically teach at the Arkansas Arts Center. The focus of that article shifted from the purpose and joy of teaching to a specific technique from the workshop: the use of stencils and stamps. This second post of the series focuses on a technique we explore in class called Image Transfer. First I’ll describe HOW to do image transfer, then I’ll talk about WHY. As with most art materials, there are countless ways to use this technique and, of course, reasons abound.

Here is what you need: any type of gel medium (as long as the words “gel medium” are in the name of the product), a paint brush (a 1″ flat bristle brush works well), and an image you want to transfer onto your work surface. This technique works on paper, canvas, wood panels, lamp shades, fabric…just about any surface with a little tooth to it. As far as the image options to transfer, you can use photos and text from magazines, newspaper, or your printer. Thick paper such as photos from a calendar are difficult and processed photography does not release the ink well. As you will see, we will rub off the paper as a final step and thick paper is much more laborious. So, magazine, newspaper and images on printer paper (at home or at stores such as Staples) work well.

For this example, let’s say you are working on a paper surface and using magazines for your image source. Once you have your image cut out, apply a liberal amount of gel medium to your paper surface (this is the surface RECEIVING the ink from your image), slightly dampen the surface of the image you want to apply, and press it face down on the paper. Apply pressure in the middle of the image and gently smooth out the air bubbles, pushing them outward toward the edges. Wherever there are air bubbles, the ink will not adhere to your paper surface. A roller or brayer works well to remove air bubbles and helps press the image ink into your paper surface which will be a new home for the ink.

photo 1 (2)

Apply a liberal amount of gel medium to the receiving surface

photo 3 (2)

Press your magazine image face down into the layer of gel medium and gently push out air bubbles using your finger or a brayer


photo 4 (2)

Remove excess gel medium with a damp paper towel

photo 1 (3)

Some people let the image dry for a few hours and have success with the transfer. However, many artists (myself included) insist that waiting 24 hours for the image to dry and set increases the success rate. So, put the piece aside and work on something else until tomorrow!

Here is another example – this time with text on canvas. Please note that when transferring text, the letters will be reversed in the end. I like the reverse text because it obscures the meaning of the words but if you want the letters to come out legibly, you can print text on your home printer. Just flip the text box in your document so you are printing backwards letters that will be reversed again in the image transfer process and will come out legibly. If this is confusing, the photos below might clarify:

photo 2 (3)

Here are the letters I want to use (from a magazine) but I need to turn them over face down

photo 4 (3)

Here are the letters attached to the canvas in gel medium face down. When I remove the paper pulp tomorrow, the face down ink will remain and the letters will be backwards

photo 3 (3)


THE NEXT DAY:

First apply water to the transfer. Don’t be stingy with the water. It will not hurt your artwork. The more water, the more it assists in breaking down the paper pulp. Using fine grain sandpaper, gently sand the back of the image transfer paper. Once you have the paper roughed up, apply more water. If it gets lots of pulp balls, just clean the surface with a damp paper towel and apply more water. Using your fingers, gently rub the paper pulp and wipe it away. Some paper is more stubborn (aka high quality) than others and the amount of time on this step can vary greatly. Be sure not to sand too hard or rub too vigorously or you might remove some of the ink that you are trying to transfer. Here are photos demonstrating the steps:

photo 1 (1) photo 2 (1)photo 3 (1)


You can use a brush to apply water to the transfer, better yet, dump water on with your hands.

photo 5 (1)photo 1 (3)


Let the water soak in and lightly sand the back of the transfer. Do not over sand or you might accidentally remove the ink.

photo 2 (2) photo 1 (2)photo 2 (3)


Once the pulp is roughed up, use wet fingers and remove layers of the pulp by rubbing the transfer in a circular motion.

photo 3 (4) photo 3 (2)


The are many reasons and uses for image transfer. Like collage, transferring commercially produced imagery CONTRASTS drawn line and paint. Unlike collage, transferred images attach seamlessly to the paper (or canvas or whatever you are working on) so the image integrates with other areas of the composition. Instead of looking added on top or glued on, the transferred photo or text appears to be embedded into the design. This is particularly effective when building a surface with layers under as well as over the image transfer.

DSC_0021 DSC_0349


A NOTE ABOUT ETHICS AND IMAGE USE:

Copyright laws and image use laws seem to change daily and it is becoming increasingly difficult to determine what images you can ethically use in your artwork. With social media and a plethora of photo apps, millions of people are publicly sharing their images while signing away ownership. In considering what images to use, I ask myself, is this photo a work of art that another artist created? How would I feel if one of my paintings appeared in another person’s artwork, and how would I feel if their art (using my work) were for sale and publicly displayed? I do not have a “one size fits all” answer; however, I believe the purpose of image transfer is to use commercially produced images in an heavily altered way. In my own work, an emphasis on layering helps alter and sometimes obliterate the transferred image. So enjoy experimenting with this technique, but always be thoughtful about the images you choose. For more information about copyright and fair use of imagery, there are many online resources such as:
http://www.collageart.org/copyright_and_fair_use/

Speaking of appropriating imagery, next up in this mixed media series is COLLAGE!

Thank you for reading!
Laura